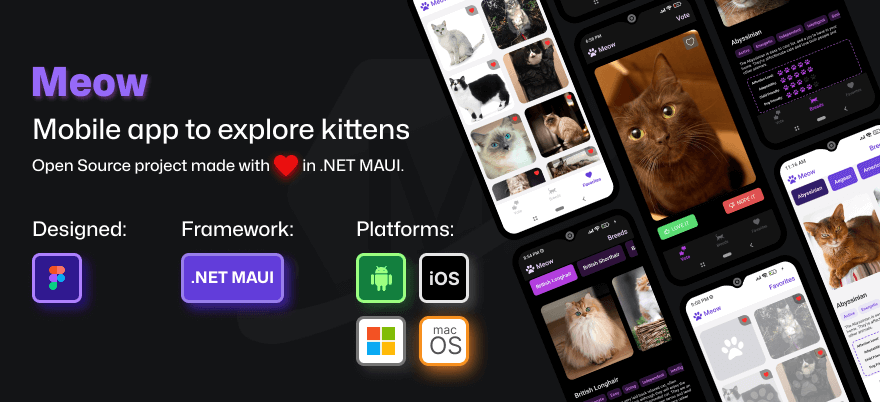
Meow in .NET MAUI: The art of connecting with TheCatAPI (Part 1)
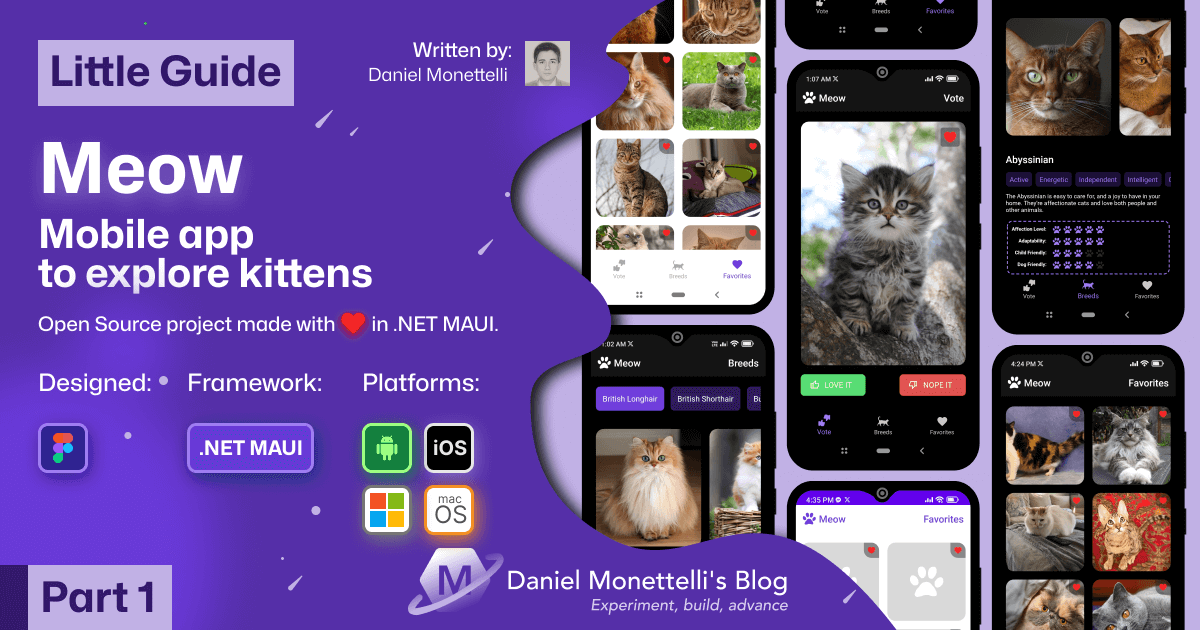
Let me tell you how Meow was born, an app I created to satisfy my curiosity with .NET MAUI. At first I just wanted to see what it felt like to consume a real API... but things got out of hand (in a good way). What started as "let's show some random kittens" ended up being quite an adventure. Saving favorites, exploring breeds, making everything flow smoothly... In the end I got more hooked than I thought. And well, here we are.
In this first part I’ll share how I set up the communication between screens and TheCatAPI. Basically, how I made the app talk to the outside world using a service class. I’ll show you GET, POST, and DELETE requests with real examples, without too much technical jargon.
If you’re starting with .NET MAUI or you’re curious about how API calls are organized, I think some of this will be useful to you. At least it’s what worked for me after several attempts.
The foundation of everything: how I got Meow to connect with the outside world
Here comes the interesting part. I’m going to tell you how I built the “engine” of Meow, that part that makes everything work but the user never sees.
What’s this all about?
- How I organized the conversation with TheCatAPI using a couple of key files:
ICatServiceandCatService. - The GET, POST and DELETE requests as I use them in the real app (no frills).
- Examples that work, explained without too much technical jargon, in case you want to adapt them.
This is the foundation on which I built everything else. It’s not rocket science, but it is the structure that allows me to keep the code organized and not go crazy when I have to change something.
In Meow almost everything goes through two files:
ICatService→ basically a list of “this is what I need to work”CatService→ the one that actually does the dirty work of talking to the API
Thanks to this division, screens only worry about showing pretty things. All the heavy lifting happens behind the scenes, invisible, so the experience is smooth.
In upcoming posts I’ll tell you about the design, animations, how I made it work without internet and more. But for now, if you wanted to see how to connect a MAUI app with a real API, this is the basics you need to know.
📚 About this series
This is the first part of a series where I’m going to tell you, without too much fluff, how I was building Meow with .NET MAUI:
- Part 1: How I connected services and views (
ICatServiceandCatService) - Part 2: The design in Figma and how I used Zeplin to stay on track
- Part 3: Creating the icon and splash screen without making them look horrible
- Part 4: Going from Zeplin designs to MAUI code that actually works
- Part 5: Building models and viewmodels that make sense
- Part 6: Saving data with SQLite + making it work without internet
- Part 7: Final touches and improvements
This series takes you from the initial idea to having something that actually works. If you liked it, save this post so you don’t miss what’s coming.
🔄 How this works inside: images and explanation
I’m going to show you what happens when you tap each button in Meow. With images and short explanations so you can understand well what each thing does.
Everything you see here is in the Meow repo on GitHub. If you want to see the complete code, there it is:
- In
ConstantsI add all the endpoints neatly organized. ICatServicedefines what methods I need.CatServicedoes all the work of talking to TheCatAPI.
Important note: To follow this series you need to know the basics of .NET MAUI, C# and how REST APIs work.
If you’re just starting, take a look at the official .NET MAUI documentation first.
1. Get random cats (GET)
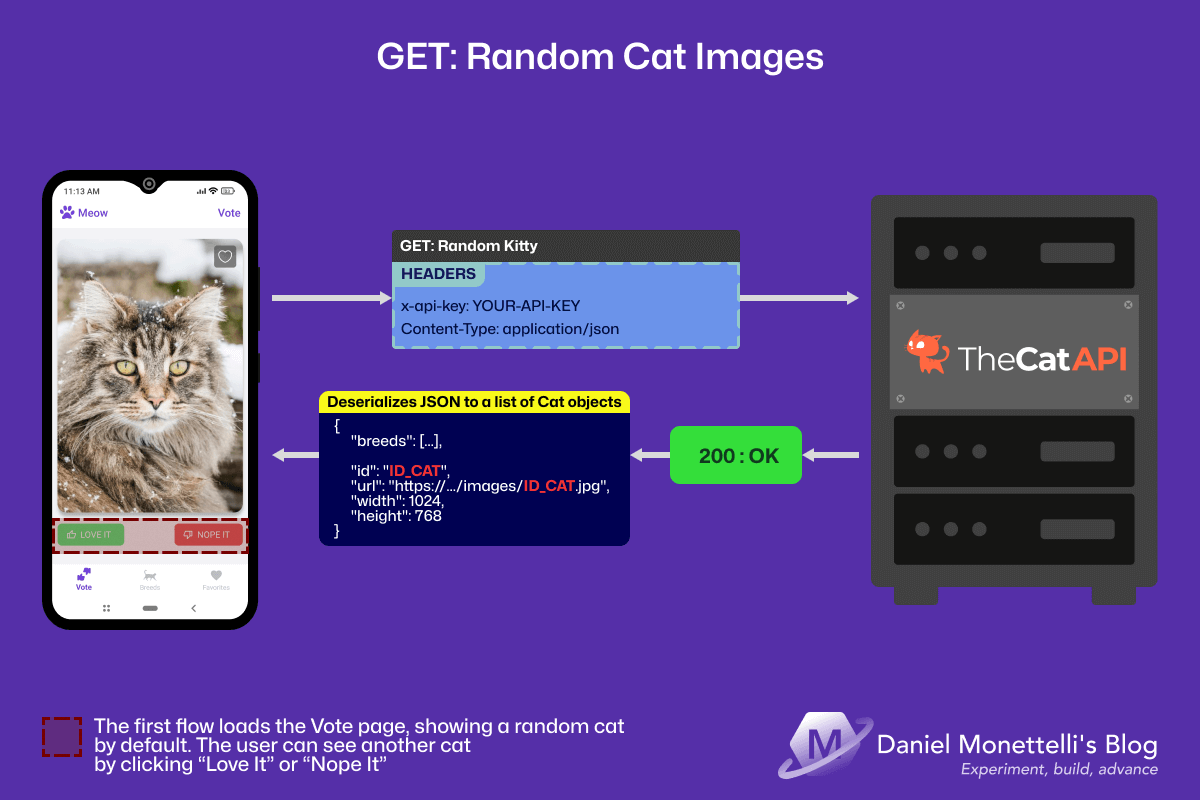 GET /images/search – Random cats for voting
What’s happening here?
I love this part because it’s very simple, but it works very well.
As soon as you enter the app, you already have a kitten in full screen. If you like it, you can tap the heart ❤️ to save it. If not, you simply select the “Love It” or “Nope It” buttons and another kitten appears.
It’s a bit like flipping through photos, but of cats. Some have serious faces, others are kind of disheveled or sleepy. You never know what you’re going to get, and that makes it fun.
And how is that achieved?
Everything works thanks to a call to /images/search, which executes every time you vote. That requests a new image from the API, and the app shows it instantly. Fast and straightforward.
The method that handles it is simple, but it works very well: every time it’s called, it tells the server something like “Do you have another kitten around?” and that’s it, a new one appears with a different expression.
There’s no complicated magic, but there is a clear flow that makes you want to keep seeing one more… and another… and another 😅.
1
2
3
4
5
6
7
8
9
10
11
12
13
14
15
16
public async Task<List<Cat>> GetRandomKitty()
{
    // "TheCatAPI, send me a surprise cat!"
    HttpResponseMessage response = await _httpClient.GetAsync(APIConstants.CustomRandomKittyEndPoint);

    // If everything went well, we process the new feline friend
    if (response.IsSuccessStatusCode)
    {
        // We convert the response into a Cat object we can use
        string content = await response.Content.ReadAsStringAsync();
        return JsonSerializer.Deserialize<List<Cat>>(content);
    }

    // If there's no internet or something fails, we return empty
    return default;
}
What’s special about this code?
I like this part because it does something very simple, but that feels well done:
- There’s a URL (
CustomRandomKittyEndPoint) that every time it’s called, brings a different kitten. It always changes. - Although normally one comes, sometimes several arrive because it’s designed to receive a list.
- Everything is done with
async, so the app doesn’t stop while loading. You can keep using it without problems. - Nothing freezes or gets stuck. Everything goes smoothly.
How does it work when using it?
- You open the app and there’s already a kitten waiting for you.
- If you like it, you mark it. If not, you move to the next one.
- In the background
GetRandomKitty()runs and requests another cat. - The new image appears without cuts or weird jumps.
- Want to continue? Just keep tapping. And more keep coming.
The truth is it’s easy to stay there for a good while.
I tested it and thought I was going to see a couple… but without realizing it, I had already spent about half an hour just looking at cats 😅.
2. Get cat breeds (GET)
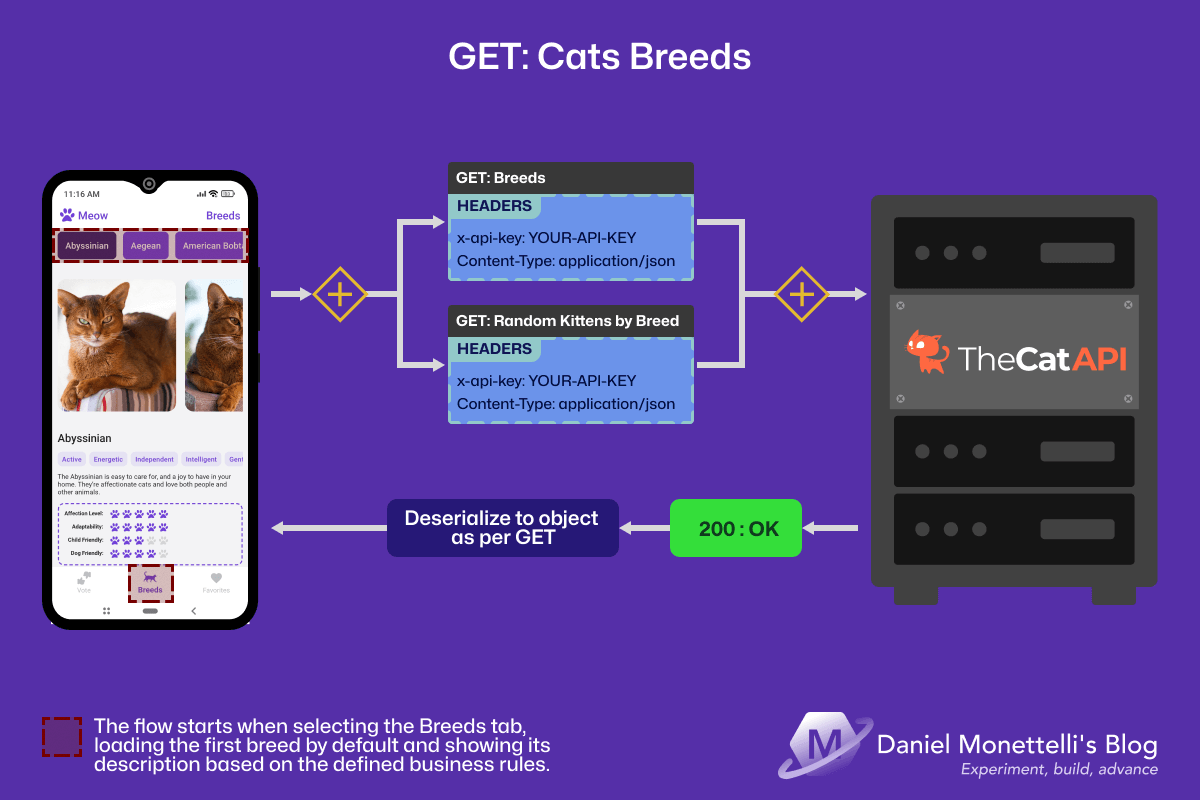 GET /breeds – List of cat breeds from TheCatAPI
What’s on this screen?
When you enter here, it’s like finding yourself with a catalog of feline breeds. There are more than 60 options: Maine Coon, Siamese, Persian… and a bunch I had no idea existed.
Each breed shows several images, the name and some interesting facts. And the nice thing is that, if one catches your attention, you just need to tap it. The app immediately shows you more similar kittens, all of that same breed. No complications, everything very natural.
It’s great if you want to learn more about these kitties, or if you simply want to see adorable versions of the same type of cat 😺.
How does this work in code?
Here two methods that work together come into play: one brings all the breeds from the API, and the other lets you filter cats according to the breed you choose. Simple and effective.
1
2
3
4
5
6
7
8
9
10
11
12
13
14
15
16
17
18
19
20
21
22
23
24
25
26
27
28
29
30
31
// Method 1: Get all available breeds
public async Task<List<Breed>> GetBreeds()
{
    // We ask TheCatAPI for all existing breeds
    HttpResponseMessage response = await _httpClient.GetAsync(APIConstants.BreedsEndPoint);

    if (response.IsSuccessStatusCode)
    {
        // We convert the JSON response into Breed objects
        string content = await response.Content.ReadAsStringAsync();
        return JsonSerializer.Deserialize<List<Breed>>(content);
    }

    return default;
}

// Method 2: Get cats filtered by specific breed
public async Task<List<Cat>> GetRandomKittensByBreed(string breed)
{
    // We build the URL with the specific breed ID
    HttpResponseMessage response = await _httpClient.GetAsync($"{APIConstants.CustomRandomKittiesByBreedEndPoints}&breed_ids={breed}");

    if (response.IsSuccessStatusCode)
    {
        // We receive up to 10 cats of the selected breed
        string content = await response.Content.ReadAsStringAsync();
        return JsonSerializer.Deserialize<List<Cat>>(content);
    }

    return default;
}
What’s special about this part?
GetBreeds(): Requests all available breeds, loads when the breeds screen opens.GetRandomKittensByBreed(breed): Shows kittens according to the breed you choose. And as soon as you enter the section, the first option already appears without you having to lift a finger. So you can start seeing from the first moment, without extra steps.- Dynamic parameter:
&breed_ids={breed}changes according to the user’s option. - Everything flows without friction: As soon as you enter, you already see something. And if you want to change breeds, you just tap. That easy.
- Multiple results at once: Not just one kitten arrives, but up to 10 of the chosen breed.
- With clear information: Each image comes with useful details about that breed.
Technical note: This logic —showing first a breed and its cats without the user doing anything— is inside the
BreedsViewModel, using MVVM.
In upcoming publications I’ll explain how that ViewModel works and how everything connects to work naturally.
How does it look in action?
- You enter the “Breeds” section →
GetBreeds()is called and all appear. - You tap the one you like → For example, “Maine Coon”.
- The app takes its unique ID → For example:
"mcoo". GetRandomKittensByBreed("mcoo")executes → And only that breed arrives.- It shows you a custom-made gallery → Only Maine Coons in this case.
This flow lets each person explore at their own pace: they can see many breeds or focus on one.
It’s like a kind of visual catalog of kittens, but much closer and easier to use 😺.
3. Add a cat to favorites (POST)
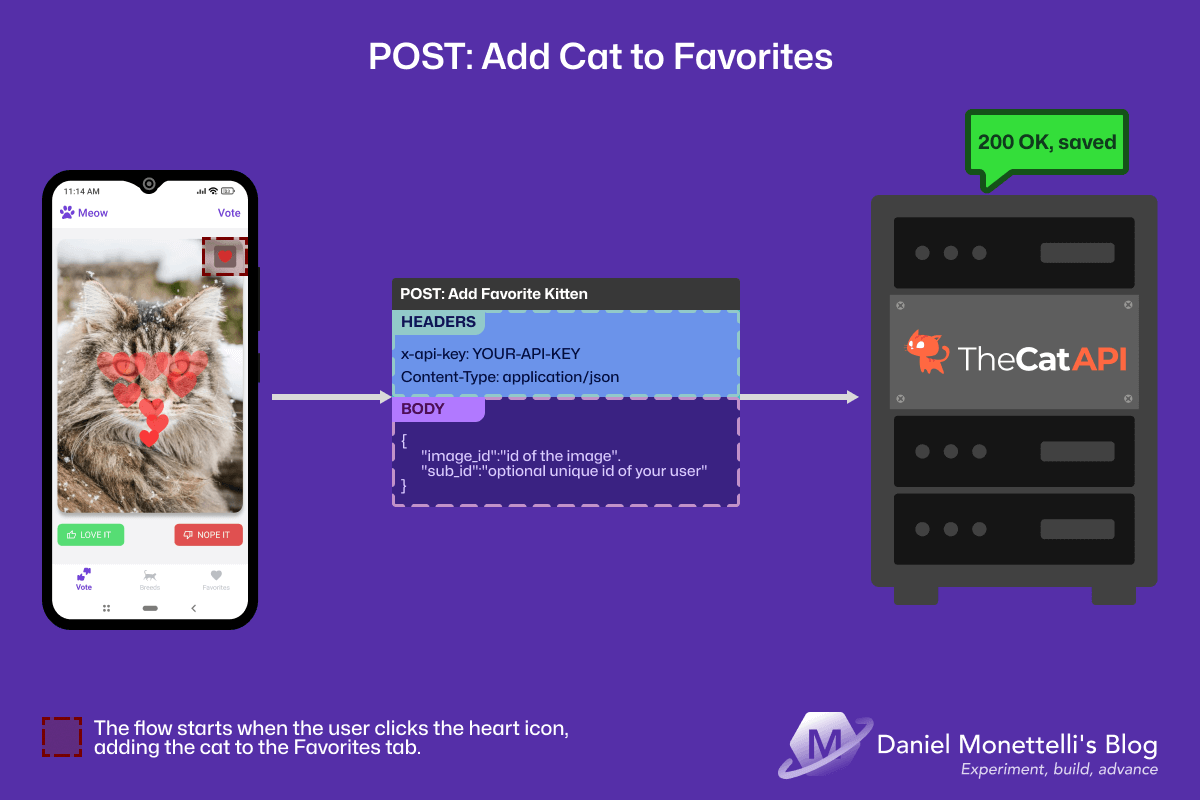 POST /favourites - Add cat to favorites
What do you see in the image?
A special moment! You found the cat. The one that won you over with its tender look or a funny pose. You tap the heart icon and… boom! It fills with color, a small animation appears, and that kitten gets saved in your personal collection.
It’s that instant of: “I’m keeping this one!” — something simple, but that manages to connect with whoever is using the app.
How is this achieved in code?
This is where the logic gets interesting. Not only is data sent to the API, but a relationship between the user and the cat is established. From that moment on, that kitten remains marked as one of your favorites within the app.
1
2
3
4
5
6
7
8
9
10
11
12
13
14
15
16
17
18
19
20
21
22
23
public async Task<string> AddFavoriteKitten(string cat_id)
{
    // First, we create a "package" with the favorite cat information
    var favoriteCatRequest = new FavoriteCatRequest()
    {
        Image_id = cat_id  // The unique ID of that specific photo
    };

    // We convert our C# object to JSON format (the language of APIs)
    var body = JsonSerializer.Serialize(favoriteCatRequest);
    var content = new StringContent(body, Encoding.UTF8, "application/json");

    // We send the "package" to TheCatAPI with POST method
    var response = await _httpClient.PostAsync(APIConstants.FavoriteKittensEndPoint, content);

    // If everything went well, the cat is already saved in the cloud
    if (response.IsSuccessStatusCode)
    {
        return await response.Content.ReadAsStringAsync();
    }

    return default;
}
What I like about this code?
It’s not something complicated, but as I was building it, I was understanding things that seemed useful to me and I wanted to share them.
One of them is the difference between GET and POST. With GET you only request information, like saying: “show me something”. But with POST, you’re already sending data to the server. In this case, what I do is tell the API: “this user wants to save this cat as a favorite”.
For that I use an object called FavoriteCatRequest, which helps me organize the information well before sending it. And with StringContent, I convert everything to JSON, which is the format the API understands.
When you tap the heart on a kitten, the app sends its ID to TheCatAPI and the icon changes color. It’s a quick way to mark that you liked it.
But there’s an important detail: since a
sub_idis not being used, those favorites don’t really get saved to your name. Everything is saved temporarily on your phone.
That means that, if you uninstall the app or change phones, you’re going to lose them without warning.
In the following publications I’ll explain how to improve this so your favorites don’t disappear.
Meanwhile, you can take a look at the documentation at thecatapi.com.
How does it work when you use it?
You tap the heart, the app takes the ID of that specific cat, prepares the information, sends it to TheCatAPI, and that’s it. The heart changes color and that kitten is now part of your personal collection.
If you don’t have internet at that moment, don’t worry. Meow remembers what you did and syncs everything when you get connection back.
- The data package is assembled → It’s like preparing an envelope with all the necessary info.
- It’s sent to TheCatAPI → The message is clear: “This user has marked this cat as a favorite”.
- Instant response → The heart animates and that kitten is now part of your collection.
Even if you’re without internet, Meow remembers your choice and syncs it when you get connection back. You never lose a favorite!
4. List favorites (GET) and delete (DELETE)
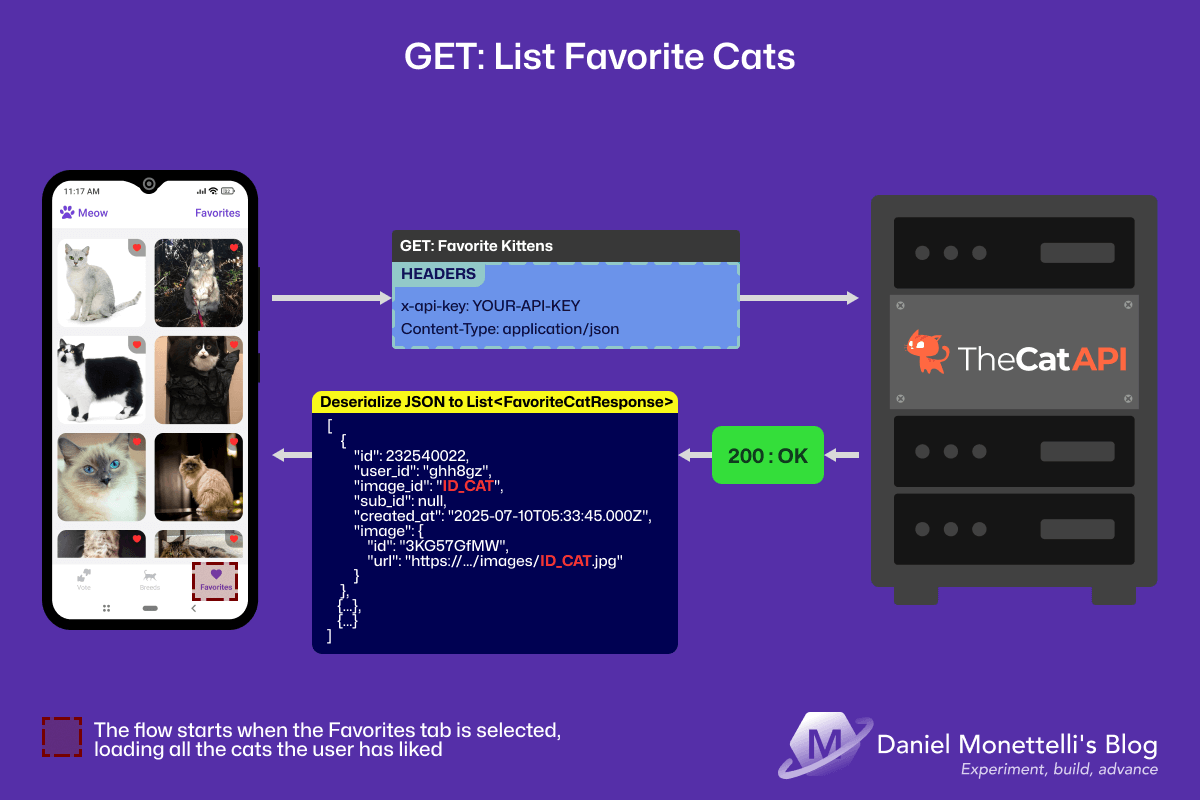 GET /favourites - List of favorites
What do you see in the image?
This space is yours alone. Here are shown the kittens you once marked as favorites, arranged in a clean grid, without complications. You don’t need much to understand it: it’s like a small collection of moments that made you smile. Maybe you remember that Maine Coon with a wise face, the Siamese that caught your attention, or the orange kitten that simply gave you tenderness.
Each one is there for something. And that makes it special.
And if one day you decide to remove any of them, you can also do it without complications. You just have to tap the image and it will be automatically deleted. That easy.
How is this achieved in code?
All this is achieved with two methods that work together: one shows your favorites, the other deletes them if you decide to.
There’s nothing complex. It’s just a way to give you control over what you want to keep… and over what you no longer need.
1
2
3
4
5
6
7
8
9
10
11
12
13
14
15
16
17
18
19
20
21
22
23
24
25
26
27
28
29
// The "librarian": brings all favorites neatly organized
public async Task<List<FavoriteCatResponse>> GetFavoriteKittens()
{
    // We ask TheCatAPI: "Show me all this user's favorites"
    HttpResponseMessage response = await _httpClient.GetAsync(APIConstants.FavoriteKittensEndPoint);

    if (response.IsSuccessStatusCode)
    {
        // We convert the JSON list into C# objects we can display
        string content = await response.Content.ReadAsStringAsync();
        return JsonSerializer.Deserialize<List<FavoriteCatResponse>>(content);
    }

    return default;
}

// The "cleanup manager": deletes specific favorites
public async Task<string> DeleteFavoriteKitten(int favourite_id)
{
    // We tell the API: "Delete this specific favorite"
    var response = await _httpClient.DeleteAsync($"{APIConstants.FavoriteKittensEndPoint}/{favourite_id}");

    if (response.IsSuccessStatusCode)
    {
        return await response.Content.ReadAsStringAsync();
    }

    return default;
}
What makes these methods special?
GEThelps me show all favorites without modifying anything.DELETEremoves a kitten from the list using its ID.- I created an object called
FavoriteCatResponsethat just better organizes the data I need to display. - The URL adapts according to the kitten you want to remove:
/favorites/{id}. - And every change syncs automatically, without the user having to do anything. That seemed important to me..
This is how it’s experienced from the app:
- When you open the favorites section, everything loads fast and without detours.
- The kittens appear in a grid, well organized, and it’s easy to see them again.
- Each one has something that, at the time, made you choose it.
- And if you want to remove any of them, with a long press the delete option appears.
- Everything updates immediately, regardless of whether you use another device later.
I thought of this part as a small corner within Meow. A quiet space, where you can keep those kittens that made you smile. And also so that, if at some point you no longer want to have them there, you can remove them without complications.
It’s made with great care, thinking about details and making the experience smooth. It’s not a complex part, but it is one of the most beloved in the entire app 🐾
Why does this pattern help me so much in .NET MAUI?
When I started with Meow, I was clear about something: if the app doesn’t respond well, people close it. And it’s totally understandable. That’s why I tried to build a simple foundation that worked well from the first tap.
🚀 A structure that gave me peace of mind
Everything revolves around a class I called CatService. There I put the logic to talk to the API and get the data. Nothing complex, but well separated. That allowed me to have clean screens, without so much mess.
The methods have easy-to-understand names. Things like GetRandomKitty() or AddFavoriteKitten(). I didn’t want to reinvent anything, just make the code readable without having to think twice.
And since I use that class throughout the app, if at some point the API changes, I only touch there… and that’s it.
🛠️ An experience I sought to be simple
What mattered most to me was that the app felt fluid. That when someone taps something, something happens. Without weird delays.
Also, I tried to make it not depend so much on the internet. If you’re without connection, it still saves what you do, and then syncs. I did this because I myself get frustrated when an app doesn’t work for a while without signal.
And in the end…
I didn’t do anything magical. I just tried to think about who was going to use Meow. If this way of organizing code works for you, I’m very happy. And if not, thanks anyway for reading this far. 🙌
💭 An honest reflection
When I started with Meow, I didn’t have a master plan. I just wanted to experiment with .NET MAUI and do something fun. What I didn’t imagine was how much I was going to learn along the way.
Every line of code, every error I had to solve, every small achievement… they’re there, in this app. I don’t consider myself an expert, I’m simply a developer who enjoys sharing what he learns, hoping it serves someone else.
Why share this?
Because it seems fair to me. I learned a lot from other people who also took the time to write what they knew. So if this saves someone time, or gives them an idea, or simply makes them smile… I feel more than good about that.
The details, that’s what I care about most
Meow is not a complex app. The truth is, it’s made with simple things. What I tried most was to take care of the details. Those small things that sometimes go unnoticed, but that make using something feel better.
From a tiny animation to making it work even if you don’t have internet.
Your next project?
It doesn’t have to be about cats (although if it is, I want to see it 😸). It can be whatever you want. The only thing I’d say is: make it clear, make it yours, and pay attention to those little things that sometimes say more than the rest.
Repository
The project is open source and you can see it by clicking on the image below. Take a look!
Resources
- TheCatAPI - Official API for getting cat images and data.
- Official .NET MAUI documentation.
- HttpClient - Official Microsoft documentation.
- System.Text.Json - JSON serialization in .NET.
Spanish publication
What else?
This was just the beginning. I still have several things to tell, and I’m excited to keep sharing them.
I worked on the design in Figma. I’ve been using it for a while, so I wanted to apply what I’ve learned and take care of the details. You can always improve, but it was nice to see how everything was taking shape.
The animations also have their story. They’re small details, but they help everything feel more natural. And yes, making it work without connection gave me more work than I imagined, but it was worth it.
If any of this catches your attention or you have any questions, write to me. It’s always good to know what others think.
Until next time.